How to repair Maxtor PCB 040105900
If a Maxtor hard disk drive with the PCB board 040105900 inside has the following failure symptoms, you need to replace and repair it in order to recover data on it, this article will show you how to buy a matching donor (replacement) PCB 040105900 and how to replacing it step by step.
Hard Drive PCB Failure Symptoms:
- Hard drive can't spin up (If you hear a tick, or do not hear or feel any movement, the PCB is probably defective);
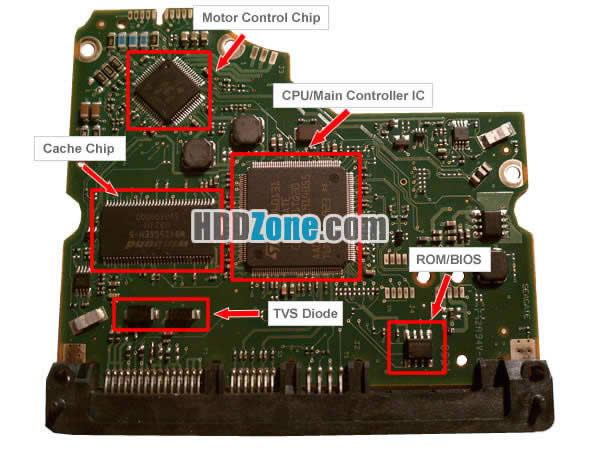
- A burning smell can be sensed coming from the hard drive; Burnt hard drive PCB components ("Motor Control Chip" burnt, "TVS Diodes" burnt, "Main Controller IC" burnt) on the PCB;
- The HDD be connected to wrong power supply;
- HDD PCB's interface damaged;
Steps to repair Maxtor HDD PCB 040105900
Step 1: Find a donor Maxtor PCB 040105900
To buy a matching donor PCB for Maxtor HDDs, we need to make sure the "Main Controller Chip" number on the PCB is the same. Main Controller Chip number is begin with "0401***". Check the board number on your hard drive, make sure it is "040105900".

Maxtor PCB 040105900
Note: We have listed some models of hard drives which are using the 040105900 PCB on hddzone.com for convenience, but to make sure, you'd better to unscrew your hard disk and have a look on the board.
Step 2: Buy Maxtor PCB 040105900 Online
Then search with "040105900" in the search box on HDDZone.com and order it online. HDDZone.com provide worldwide free shipping (7-20 business days), we also provide expedited shipping (3-7 days) such as DHL & UPS.

Search for Maxtor PCB 040105900 On HDDZone.com
Step 3: Recover and Backup Data
After the firmware transfer is completed, the Maxtor hard drive PCB 040105900 replacement repair process is finished! Connect your HDD to your PC and restart your computer, you will be able to recover data from your HDD now! Backup! Backup! Backup!

Data Recovery & Backup
About Hard Drive PCB Components:

Hard Drive PCB Components
BIOS: All of the 8pins (4 pins on each sides) with 25P05VP,25P10VP,25F512,25F1024,25F1024AN,SST25VF512,SST25VF010, etc. are the BIOS. It is easy to be found, because there are not many 8pins chips on the PCB.
Main Controller IC: If there is no matching 8pins BIOS chip on the PCB, it means the BIOS is integrated on the Main Controller IC. It is more complex to exchange the Main Controller IC than exchange the BIOS. If you should do, please do several test on the HDD's PCBs which don't have the important data.
About Firmware Transfer Tool & Steps:

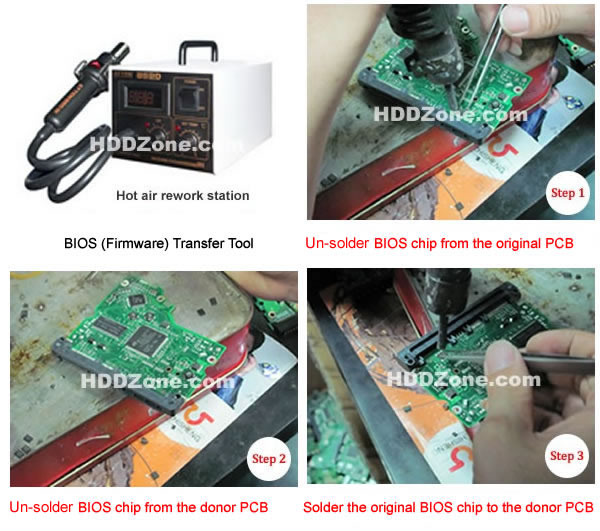
Hard Drive PCB Firmware Transfer Tool & Steps
HDD PCB Firmware Transfer Tools:
- Hot air rework station;
- T6/T8 Screwdriver(available on HDDZone.com product page);
- Tweezers;
Steps to transfer firmware on the PCB:
- Remove BIOS chip from the original PCB;
- Remove BIOS chip from the donor PCB;
- Solder the original BIOS chip to the donor PCB;
Tips: Most of the TV, phone, electronics repair shop can offer this firmware transfer service for just $5-20.
Contact US:
Please feel free to contact US if you have any questions, email us the clear photos of Maxtor PCB 040105900 (both sides) by attachments to us will make everything easier! Email: sales@hddzone.com


