How to Fix a Hard Drive PCB Board
"Hi guys 3 days back my computer got shut down with smoke coming out of my WD 500gb SATA hdd , it had a peculiar smell to it. the hdd doesnt get detected. I have inquired about Data recovery which were listed in the wdc site but the prices are too steep for me to bear.
After inquiring with my office sys-admin i got to know that i can get my burnt hdd pcb repaired. So i want to figure out who do such kind of repair."
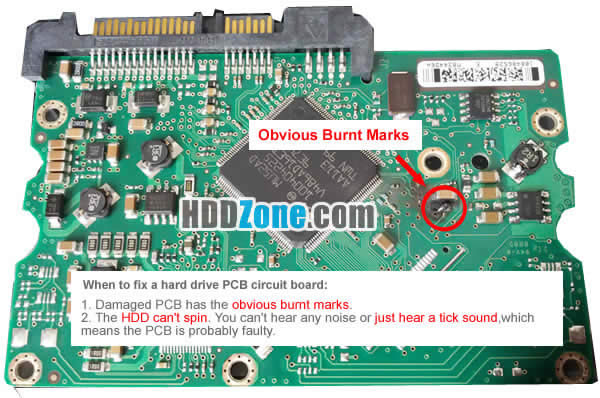
When to fix a hard drive PCB circuit board:
- Damaged PCB has the obvious burnt marks.
- The HDD can't spin. You can't hear any noise or just hear a tick sound, which means the PCB is probably faulty.

Damaged Hard Drive PCB Board
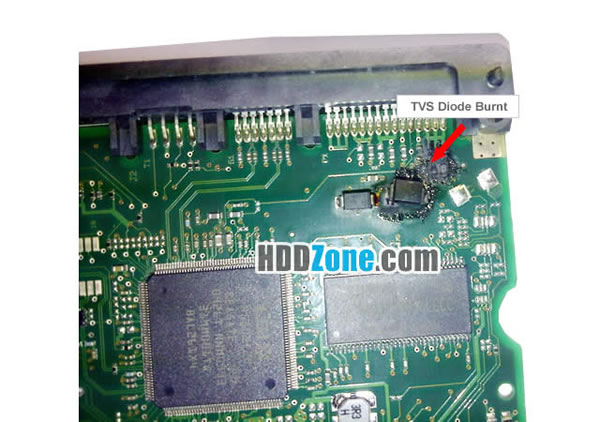
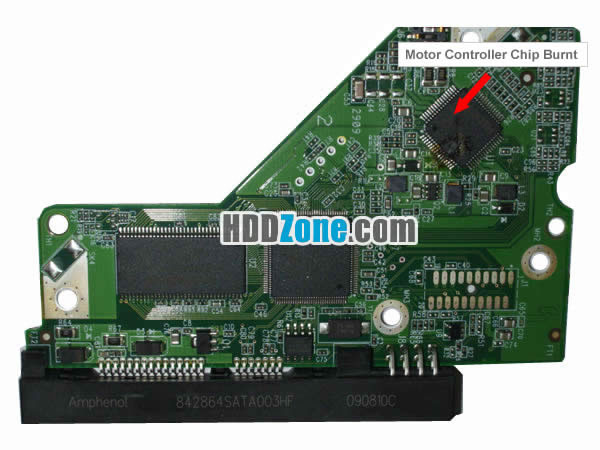
Most PCB failures are caused by Motor Controller Chip burnt, then the TVS diodes burnt and Main Controller IC burnt. In most cases, Motor Controller chip burnt by be seen by eyes. We can see a burnt hole or raised part on the Motor Controller IC. TVS diodes' short circuit can be test by a multimeter. Main Controller IC is difficult to be test. Burnt TVS diodes or Motor Controller IC can be repaired by using the same model chip or diodes. Of course, this operation is just be used by the technicians who has the Circuit repair knowledge. For common user, the best way is swap PCB.

TVS Diode Burnt

Motor Controller Chip Burnt
Steps to fix a hard drive pcb board
Step 1. Find a donor PCB.
Get a replacement PCB identical to your current one, otherwise it won't work. For Seagate, Western Digital, Samsung, Maxtor and IBM/Hitachi HDD PCB you can refer to these swap guides:
- Seagate PCB Swap Replacement Guide
- Western Digital PCB Swap Replacement Guide
- Samsung PCB Swap Replacement Guide
- IBM Hitachi PCB Swap Replacement Guide
- Maxtor PCB Swap Replacement Guide

Seagate Hard Drive PCB Swap Guide

Western Digital Hard Drive PCB Swap Guide(WD IDE HDD)

Samsung Hard Drive PCB Swap Guide(Samsung Laptop HDD)

Hitachi Hard Drive PCB Swap Guide(Hitachi 3.5" HDD)

Maxtor Hard Drive PCB Swap Guide
Step 2: Search PCB on HDDZone.com.
Search on our website with the board number(for Seagate, Western Digital and Samsung HDD) or Main Controller IC number(for Hitachi, IBM and Maxtor HDD) of the board. This won't give you the exact model, but look through the list of results and find the board that matches the numbers you noted down in the first step. Now, buy it!
Step 3: Check your PCB:
The replacement PCB should take about 3 to 5 working days(free shipping with take 7-15 days) to arrive through the post. When the mail man comes round, you should receive a box with a replacement working PCB inside. Check the PCB to make sure this is the right one you bought on our site.
Step 4: Remove the old PCB and Attach donor PCB.
Some older drives have the same basic information on two PCB boards of the same model, provided that both drives were made at about the same time, before more unique adaptives were programmed into the next line of drives. If one of the PCBs fails, there is some chance of making a recovery by simply swapping the boards of the two drives. However, hard drives have contained "customized" firmware on at least an occasional basis since they've become a consumer product, so the chances of a straight "board swap" working are low. So in most cases you also need to move the old PCB's BIOS to the replacement one.

Hard Drive PCB Swap Guide(ROM Chips Exchange)
Reference: Hard drive PCB BIOS/ROM Chip
Step 5: Check your drive.
Turn on your PC. Connect your hard drive to your dock, plug it into the PC and power it up. If the problem with your old drive was due to a faulty PCB, replacing it should now allow your drive to be recognised properly. Copy and backup your data. Don't attempt to use the drive once this is done: chances are it might turn faulty in the future.
Back to Home: HDD PCB Rescources


